CLICK HERE FOR THOUSANDS OF FREE BLOGGER TEMPLATES »
Showing posts with label Down. Show all posts

Wednesday, October 1, 2008

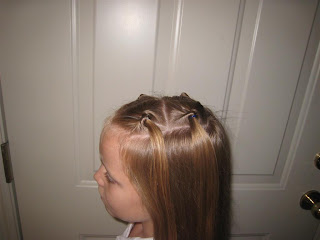
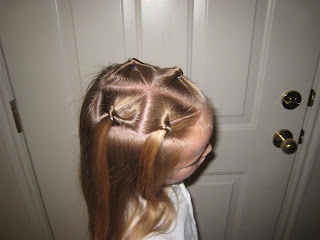
Four Bugs Down

Some of you may have already noticed that I love braids! I love them because they are simple, you can do a lot with them, they don't take a lot of time and I think they look fabulous. You may have also noticed that I do really simple hairdos. One thing that I was not blessed with was patience (along with bow making capabilities), so you have probably noticed that most of our hairdos take less than 20 minutes. If I know that a hairdo will take longer, I don't even attempt it. And it seems I'm always running late so I never have time to do really extravagant hairdos like a lot of my fellow hairdo bloggers - whom BTW I admire so much, they are SO talented - so with that said her is another simple, fun and quick hairdo;

Four Bugs Down

* Part the hair down the middle to her crown.
* Part it on each side, about two inches from the original part.
* Part across the top from both side parts to make four sections.
* Put each section into a ponytail in the middle of the section.
* Either use a Topsytail or do a knot with each pony. I did the bugs/knots on the outside corners of the bottom sections and the bottom outside corners of the top sections.

* this took about 5 minutes.


Wednesday, August 13, 2008

Braided Flower

Or Teague (my little boy) named it The Roller Coaster.

* Start out with a half ponytail.
* In my mind a flower has five petals, so I did five braids.


* Then you pull each braid through the ponytail holder (I used my Topsytail jr.).
* Make sure that you pull the braids through, so they poke out of the center. So, from the side of the holder that is closest to the head, or farthest from you. (does that make sense?)


Piper felt like she needed to take this picture, ignore the messy counter space.


* After pulling all of the braids through, use a flat iron to curl the ends of the braids and the end of the hair left hanging down, and this is the result.

*This took about 15 minutes.

Monday, July 28, 2008

Braided Headbands

These are some of the pictures that have been in a folder on my desktop for awhile now, so here we go.

I decided to do this in one post, even though there are two styles, because they are the same thing, only one has two braids and one has four. Also, Piper has on the same outfit both times. I didn't intend for this to happen. These hairdo's were done about a week and a half apart.

*I use her natural part, on her right side, for this style. I am sure it would look cute with the part down the middle as well.
*At the back of the original part, I part down on both sides and secure all of the remaining hair in a ponytail holder so it doesn't get in the way.
* Then I french braid, underneath so the braid lays on top. I like how it makes it look kind of like a headband.
*I braid all the way to the end of the hair and secure it with a rubber band, then I secure both braids in the back underneath her hair that was left down.


*This took about 10 minutes

*For 4 braids it took about 15 minutes


This is what it looks like with 4 braids


Tuesday, July 22, 2008

3 mini twists

If I had my way on this hairdo, I would have taken a little more time to make sure that they all made it to the center of her head. However, Piper was a little impatient this day so it is a little crooked, but still cute. Click here so you can know how to do the twists.

* I used Piper's natural part for this style. (on her right side)
* I parted down each side from the back of the original part.
* I did the twist on the right side and secured it with a rubber band.
* I divided her left side into two sections and twisted each one of them, securing them with rubber bands.
* When all three were completed I gathered them into one ponytail and secured with a rubber band and added the bow.

* This took about ten minutes.

We got a lot of compliments on this one.


Tuesday, July 15, 2008

Bug Pyramid

This is another one that I use the topsytail on, but you can do it without, click here for a great tutorial by blackeyedsue on how to do a "knot" or as we call it a "bug."

*I part her hair down the middle into two sections. (You will notice that I didn't part far enough back on this day, Piper's cowlick on her left side shows.)
*Then from the end of the part, I part down the sides, but not all the way, I left some hair down on either side. I stopped about an inch and a half above her ears.
*Of course, I put all of the remaining hair in a ponytail holder so it wouldn't get in the way.
*For some reason, I always start on her right side. I started with the top section and parted it about an inch down from the original center part, then into three sections.
*I put each of the three sections in a rubber band and did a bug.
*On the next section, again I went down about an inch from the second part and then divided it into only two sections. I included half of the middle bug and the entire left or right bug in the next two pony's, then turned them into bugs.
*On the final section, I included both bugs from the middle section into the final pony and then turned it into a bug.
*I then repeated everything on her right side.
This took about 15 minutes.


Monday, June 23, 2008

Band Braids

Blackeyedsue calls these puffy braids on her blog. I was actually going to do them on an angle and do something pretty with the back, but we were running really short on time this morning. In fact, you may even notice that her hair is still a little wet.

First, I part her hair down the middle to the center of her head, then I part it into two sections from the middle part down to each ear.

To do the first ponytail I make another part going from the middle part to the side and put it into a ponytail with a rubber band. Then I part the next section and make sure to comb it so it is smooth, I put the first ponytail into it and make the second ponytail with another rubber band. and keep going until I am finished. Then do the same thing on the other side.


I know, she needs her hair cut! (look at those ends.) She has an appointment.

Sunday, June 15, 2008

Bug March

So, whenever I use the good old fashioned "topsytail," that my mom bought via infomercial back in Jr. High, Piper calls them "bugs."


Since there is a line of "bugs," she came up with the name "Bug March." Or Aaron calls it "The Spinal Column," which ever you prefer...... If you don't have a topsytail, click here for a tutorial by Girly Do's.

Anyway, I start by parting a square on the top of the head, then I secure the rest of the hair in a ponytail holder so it doesn't get in the way.

Then I do a diagonal part from front to back, mostly for symmetry, then I know that I do 3 bugs on each side.

I do the first ponytail and pull it through with the topsytail, then I include the first ponytail in the second ponytail and pull it through the topsytail and so on....until it looks like this.


Wednesday, June 11, 2008

Little Triple Braid

On this one I just did three little French braids on the top of her head. I would put a rubber band at the bottom of each one, then when all three were finished I connected the three braids with one rubber band. I clipped the flower on the middle braid only.