Go check out my friend Amber's blog!! She has it updated with pictures of the bows and blossoms that she makes. She has killer prices, and you can't beat the quality. She does beautiful work!
Friday, October 3, 2008
Brynn's Bows and Blossoms
Go check out my friend Amber's blog!! She has it updated with pictures of the bows and blossoms that she makes. She has killer prices, and you can't beat the quality. She does beautiful work!
Posted by Ms. Karlyn at 9:37 PM 10 comments
Thursday, October 2, 2008
Four Bugs with Two Pigges
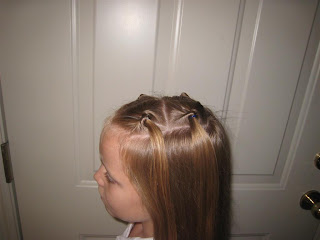
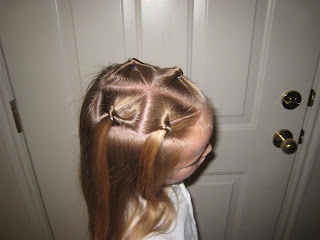
This was the day after Four Bugs Down. So I quickly redid the four bugs (since she slept on them), then I continued the center part all the way down, and put all of the hair hanging down into piggies and added bows....CUTE! I really like this one.
I'm not sure how long it took, maybe 5-7 minutes is all.
Posted by Ms. Karlyn at 9:51 AM 8 comments
Wednesday, October 1, 2008
Four Bugs Down
Some of you may have already noticed that I love braids! I love them because they are simple, you can do a lot with them, they don't take a lot of time and I think they look fabulous. You may have also noticed that I do really simple hairdos. One thing that I was not blessed with was patience (along with bow making capabilities), so you have probably noticed that most of our hairdos take less than 20 minutes. If I know that a hairdo will take longer, I don't even attempt it. And it seems I'm always running late so I never have time to do really extravagant hairdos like a lot of my fellow hairdo bloggers - whom BTW I admire so much, they are SO talented - so with that said her is another simple, fun and quick hairdo;
* Part it on each side, about two inches from the original part.
* Part across the top from both side parts to make four sections.
* Put each section into a ponytail in the middle of the section.
* Either use a Topsytail or do a knot with each pony. I did the bugs/knots on the outside corners of the bottom sections and the bottom outside corners of the top sections.
* this took about 5 minutes.


Posted by Ms. Karlyn at 11:31 AM 5 comments
Friday, September 26, 2008
Give Away!!!
Everyone head on over to Hair's Our Life. She has a fabulous giveaway going on!! Make sure to tell her that I sent you!!!
Posted by Ms. Karlyn at 10:35 AM 0 comments
Wednesday, September 24, 2008
Crown with a flip
For some reason I did this crown differently than I usually do, but I actually like the way it turned out better than my usual one.
For my usual one I don't do a part across the middle of the head, I just do a side part and start braiding and it turns out great.
For this one;
* I did a part across the back of her head. Not a very straight part, but a part nonetheless.
* I started braiding above her ear on the left side. I braided under so the braid would lay on top.
* I continued to braid all the way around.
* When I ran out of hair to french braid, I just continued braiding.
* I was going to tuck the braid in and hide it, but Piper said that she wanted to leave it out. At first I was like, '.......um okay, whatever you want!" But, I think it turned out really cute.
* I bobby pinned it in place and added a little flower.
* This took about 15 minutes.
Posted by Ms. Karlyn at 6:53 PM 2 comments
Tuesday, September 23, 2008
Criss Cross Braids with Piggies
I was originally going for this (one that we love and do often), however once I got the braids in, I thought it would look cute if we did piggies. This was the first day of school, so we wanted to make sure that it looked cute. I think it did.
This only took about 10 minutes.
Posted by Ms. Karlyn at 6:54 PM 7 comments
Friday, August 29, 2008
Patience Braids
Piper named these "Patience Braids," not only because she has to be extremely patient, but so does mom. I think they are pretty self explanatory, so instead of telling you how to do them step by step, I am going to tell you my mistakes so you don't make them too.
* I am so use to braiding under, that it has turned into a habit. The morning after, the top of the braid was crazy, if I would have braided over, this probably wouldn't have happened.
* I tried to get all creative with the parts...don't...just do simple block parts, I think it would have looked nicer.
* I started too late at night. Piper fell asleep. I did the last five or so braids while she was laying down sleeping.
* I did it all by myself. Recruit, recruit, recruit. It would cut the time in half.
I did these on Monday night, when we got ready for the day on Tuesday morning, I tried to straighten out the kinks. I did my best anyway.
Oh, the beads, these are optional, Piper loved the idea though. I know that there are a variety of different ways to finish up the ends, but this is how I did it.
* When I got to the end of the braid, I twisted the rubber band around a few times.
* I put the bead on.
* I folded the remaining hair over the bead.
* Then twisted the rubber band around again a few times.
Oh how I wish this looked better, and it can. And it will next time.
Piper really loved this. She would still shampoo her hair, just carefully. This morning we took them out and Piper ask if we could do it again really soon. However, before we took them out, she had a bath. She tried not to get the braids wet, but you will notice in the next pictures, she did, but we didn't have time to wait for them to dry, and the blow dryer doesn't really work in this situation. We didn't have time to take a picture as soon as we finished her hair this morning when it was really poofy, so these pictures are after a day of playing. Also, I curled the ends under with a flat iron.
This is the side that got wet:
Posted by Ms. Karlyn at 7:14 PM 11 comments
Labels: Braids
Girly Do's
So, I am the last hair mom to tell you to get your butt over to Girly Do's for her fabulous giveaway.....but do it! Go over and check it out, it really is a good one.
And, I will be doing a hair post soon.
Posted by Ms. Karlyn at 2:30 PM 0 comments
Labels: Giveaways
Tuesday, August 26, 2008
Sorry!
Sorry I haven't posted in awhile. Our internet was down for a couple of days and Piper has been doing her own hair.
We did "patience briads" last night, I was going to do a post on them, and I still might, but after she slept on them they are a little crooked. I didn't take a picture as soon as they were done because she actually fell asleep before I finished.
And also, my mind is a little blank, I am trying to come up with new ideas.
My kidlets start school on September 8, so I probably won't be posting as much...Piper's hair can't be too "crazy" for school, we usually do it very conservative, but I will do what I can.
Keep checking!
Posted by Ms. Karlyn at 11:43 AM 3 comments
Wednesday, August 13, 2008
Braided Flower
Or Teague (my little boy) named it The Roller Coaster.
* Start out with a half ponytail.
* In my mind a flower has five petals, so I did five braids.
* Then you pull each braid through the ponytail holder (I used my Topsytail jr.).
* Make sure that you pull the braids through, so they poke out of the center. So, from the side of the holder that is closest to the head, or farthest from you. (does that make sense?)
Piper felt like she needed to take this picture, ignore the messy counter space.
* After pulling all of the braids through, use a flat iron to curl the ends of the braids and the end of the hair left hanging down, and this is the result.
*This took about 15 minutes.
Posted by Ms. Karlyn at 9:42 AM 24 comments
Friday, August 8, 2008
Sorta Sideways french braids w/ messy piggies
Long name huh? Anyway, this came to me as I lay in bed sleeplessly. So, I tried it. When I got to the end of the braid on the first side, my brain started going crazy with ideas on what to do with the hair, but in the end, we just did messy piggies. It would look cute with Leah buns, regular piggies, curled piggies or if you angle it a little differently, it would look cute just braided.
* I started with a part down the middle and put the left side in a ponytail holder to keep it out of the way.
* I started the braid right at the crown of her head and worked my way down to her ear.
* I actually kept braiding then put the ponytail holder in right above her ear and combed out the braid that was past the holder. Then on the third pull through (remember, I'm a counter) I didn't pull her hair all the way through.
* I tightened the holder two more times around the messy piggy. 5 total pull throughs.
* Repeated the same thing on the other side.
* I used a flat iron to curl the "messy" part.
* This took 20 minutes, but will take less, probably 10 or so. Like I said before, my brain was going crazy trying to decide what to do at the end.
Also, you may notice that her left side is a little bit messy, or not as smooth. Well...after I had already finished the right side and I started braiding the left side, I notice that there was a section of her hair that wasn't completely rinsed out. So, the hair was really slippery between my fingers. But I didn't want to start all over!!!
Posted by Ms. Karlyn at 1:10 PM 4 comments
Labels: French Braids, Pigtails
Wednesday, August 6, 2008
Two Braids to a Pony
An old standby. And as you all know by now, I love braids, especially french braids.
* I part her hair in the middle back to the end of the top of her head. (did that make sense?)
* Then down each side.
* I put the hair hanging down in a ponytail holder to keep it out of the way.
* I french braid both of the top sections and braid down to about where the pony is going to be (a little bit further actually) and put rubber bands in to hold the braids.
* Comb the remaining hair and the braids into a ponytail.
* Take out the rubber bands from the bottom of the braids and comb the ponytail out.
* Add a bow, ribbon or flower.
* This takes about 10 minutes.
Posted by Ms. Karlyn at 8:04 PM 5 comments
Labels: French Braids, Ponytails


